In the kitchen

Search This Blog

Showing posts with label cakes. Show all posts

Thursday, December 12, 2013

Christmas crazy making: JUST SAY NO

Last year I so overdid it with Christmas baking that I said to Sandi, "Please don't let me do that again next year." She replied, "Well, I will try but when you want to do something there isn't much stopping you."

Strong point.

It had gotten really out of hand, though, and last year  I compiled tins with 8 or so different baked items and gave them out to 25 or so people.  I spent most of December in the kitchen and baking went from a creative outlet and slipped over into light insanity.   I'm not sure where the fine line is between adding peanut butter cups to your annual holiday repertoire and feeling all but chained to your kitchen but I decided that I had no business baking like that until I could figure it out.

So last December I actually set an alert in this year's calendar, a whole 12 months away,  NOT to bake for the holidays. I even wrote pretty please, no holiday baking on the alert.

When my phone chirped the remainder sent from a sane, post holiday version of myself, I laughed and noted that there was no resistance on my part.  I did not even want to bake.

Then I got an email from my Trek Across Maine team captain about the fundraising bake sale in early  December to raise money for the pricey cycle jersey for our team.

OH NO!!!!!

I had to laugh at the irony of this.  Was the universe testing me?  Was I supposed to say no or figure out how to be more moderate?  I told her I would think about it, that I had promised myself I wouldn't bake...and then she told me that my granola bars had been one of the first things to sell last year.  (After all this bake sale is held at the gym.)  That did it.

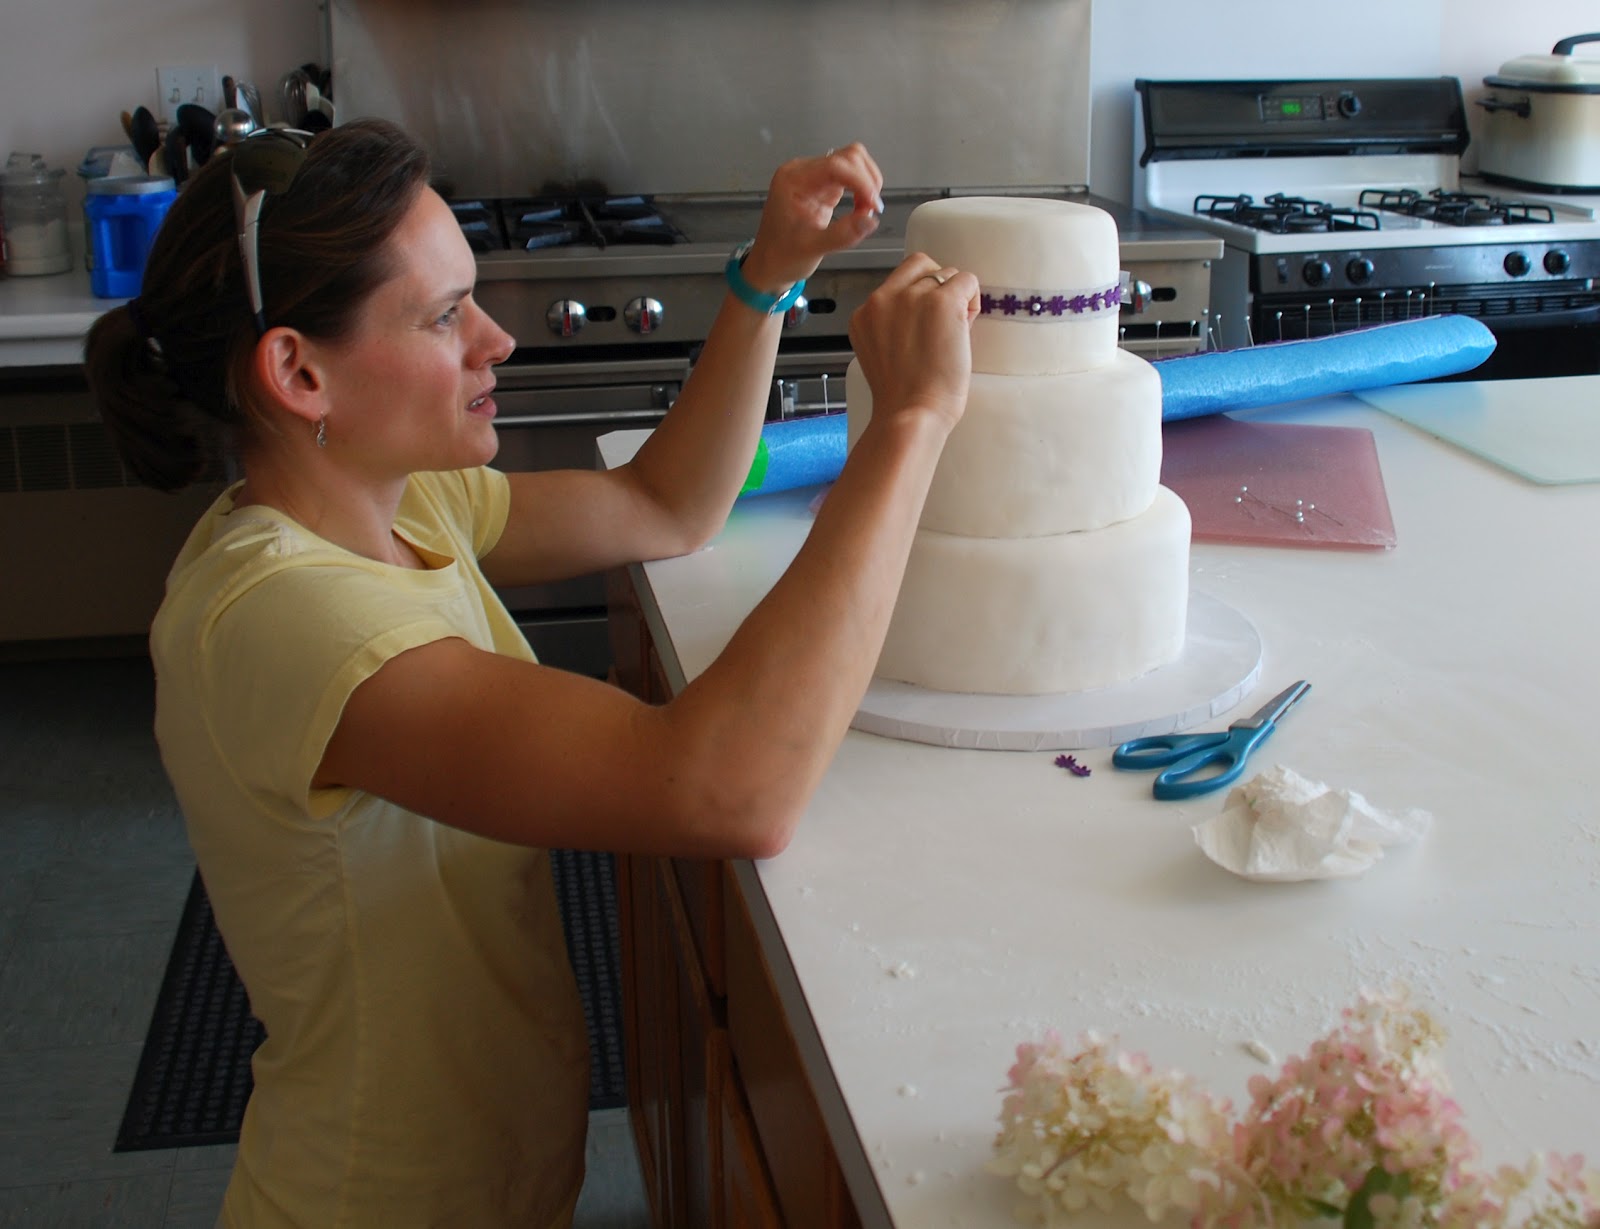
I knew granola bars held less potential for insanity for me than say, triple chocolate cookies, and so I said I would do it.  Then I remembered all the vanilla cake scraps I had in gallon bags in the freezer from trimming the wedding cake I made this fall.  I could make cake pops - which I do not like- and fulfill a creative need with minimal temptation.

Have you ever made cake pops?  They are kind of fun and have a lot of space for playing around.

(The short story on how to make a cake pops: take cake scraps- or cook a cake and cool it- crumble it up and mix it with frosting.  The ratio is about 1:3 frosting to cake.  Roll the mixture into balls.  Harden in freezer for a few minutes or wrap tightly and freeze until you are ready to use.  Defrost.  Dip a lollipop stick in melted Candy Melts and put it in the cake pop- I usually make a hole in the balled caked first to make it easier and neater.  Place in freezer for about 10 or so minutes to firm up again.  Then dip the cake pop in any color of melted Candy Melt you choose.  Decorate with sprinkles while still wet or drizzle another color over hardened cake pops. That's pretty much all!)


Sandi came up with this neat idea to display them.  I covered the Styrofoam I use to hold them while I make them with Christmas paper and then stuck the sticks through.  When the bake sale was over I just removed the paper and could keep the Styrofoam for next time.
Here is what I'm learning about taking care of myself.  First, I need to say no more than I want to.  Second, that saying no to things that I truly don't want to do is not all that difficult.  I struggle because there are so many things I do want to do, or help with, or try, or make time for but is not reasonable or joy-producing to do it all. I have a hard time saying no to those things that I might want but don't have space for.   But each time I do and the world stays intact, I affirm my own right to breathe easy and enjoy what I AM doing.

I had to laugh when I announced I wasn't going to do my holiday baking and Sandi said, "Good...except you will make petite fours right?" These are my favorite to make because they are intricate (but also time consuming) and pretty and everyone loves them.  So I set aside some time to enjoy making them. I put the batch in the freezer to take here or there as small tokens to people and I set aside some for Ange who loves them.  Then a few days later Ange said to me, "I'm so proud of you for not doing your baking this year but, wait, does that mean no layered almond cookies?" (petite fours) and I had to just laugh and assure her that I had some with her name on them.

I am proud of how I am doing this holiday season.  Between the baking and the solo work of the holidays the past two years, I felt totally beat up when they were over.  So far this year, I've gotten to do some of what I love without making myself nuts.  If I had skipped baking altogether I would have missed one of the things I love about this time of year.  Sandi and I are being realistic about our plans and even scaling back and declining invites that would be fun but too crunched, too stressful.  I think I might be maturing on the balance front.

It is my vow to sit by my fire more and enjoy our Christmas lights and to not let meditation fall by the wayside as holiday tasks creep in.   I want to make sure, above all, that my kids are having fun, that I am having fun and that I feel love and joy, not stress and strain.  This doesn't seem like it should be so hard but I have to work to keep the intention every day.  The holidays just have a way of becoming crazy.

Our lives are finding their way back to normal in such an easy and beautiful way that I find myself having periods of undisturbed contentment.  I want to foster this as much as possible.  Sandi and I celebrated our 13th anniversary yesterday and I have so much to be grateful for that I want that to be the balance of how my days are spent.

That is my gift to myself this Christmas.  That an awesome new purse I have yet to pick out.

Monday, March 18, 2013

two wonderous lives and a cake to celebrate

It is hard to believe that year has gone by since our friends Mindy and Charissa went from a three to a five person family.

Would you look how tiny their twins were at birth?
Happy first birthday to Drew and Baxter!  What better way to celebrate this amazing, exhausting, roller coaster ride of a year than with a party?
 
And we all know every good party needs a good cake.   
 
Now, to be honest when I offered to make the cake, I was thinking of  a sweet little cake with maybe polka dots and soft colors.  Maybe something simple and easy.
 
But my friend Charissa has a designer's mind and she had ideas.  I love her for this, but it also had me sweating. She was working with a nature theme and sent me pictures of cute trees and owls.  She sent a lot of owls.  I got nervous and began to worry I was in over my head.  I can't draw an owl on paper (it would likely look like a horse which, frankly, looks the same as a dog and a chicken- I am a terrible artist.)
 
I sent Charissa a text message that said, "I think this may be beyond my skill level."
 
Enter in Ange who saved the day, as she often does, by remember there were owl cake pops in her new cake pop book. 
 
Cake on a stick?  What's not to love.
I highly recommend this book.  It has such cute and creative ideas which are *mostly* within the scope of the average baker.  There is a learning curve and I had a few hiccups but overall I was pleased with the end result.

Be forewarned: cake pops take a lot of time to make.  I don't recommend trying this on a Saturday with your kids are at home unless there is a marathon showing of "The Fresh Beat Band" on TV. 

This is how I broke it down to largely coincide with my kids' school schedule.

Day one: I baked a box cake and let it cool overnight.

Day two: I crumbled the cake, mixed it with the frosting, formed the mixture into balls and put them in the refrigerator.  The recipe called for 48 balls, but I ended up with 38.  Oh well.

Day three (could have been later in day two): Shaped the chilled balls into the triangles required to make owls.  Adhered chocolate chips as ears to each pop.  Allowed to dry.

Same day: dipped cake pop in melted candy melts.  Gave my kids a disc of unmelted candy melts and had them begging for more because they are, honestly, delicious.
Because of time I ended up doing the dipping at two different time.  Here was the issue I soon discovered in the general instructions about forming and dipping cake pops, it says to dip them when they are chilled.  Yet, in the owl instructions specifically, you attach the chocolate chips and allow them to dry in the styrofoam block.  It doesn't say anything about returning the pops to the fridge. Apparently I needed to.  The batch that was at room temperature came out with a dull finish and I lost a couple of pops in the candy melts (which for me was rather merciful since it was two less pops to manage).  I realized that I probably needed them to be chilled so I managed to get the second batch to fit in the fridge and then I dipped those after they chilled again.  These came out much prettier, shinier, were easier to dip, BUT at least half of them cracked. 

Sigh.  I ended up re dipping all of them so they would look uniform.  The book specifically suggests  avoiding this. Oh well.  It was fine except that it made extra work and it also rounded out the owl ears so they looked more like mouse ears.

Day four (or day three if you don't have kids): decorate.

To decorate the owls I went on a virtual treasure hunt for the various candies needed for each feature: candy necklaces, rainbow sprinkle chips, brown mini M&Ms (I couldn't find those so I used Raisinets) and flower sprinkles.  Maya demonstrated her stellar fine motor skills and helped me sort all the candy for only the colors we needed.  (There was a lot of candy I had to buy that we didn't end up using since we were looking for specific colors.)  I assembled half of them during school hours and the rest one afternoon which was a somewhat regrettable choice.  Maya really wanted to help.  This was kind of fun because it was like I was the surgeon and she was my scrub nurse.  I would say, "Nose" and hold my hand out and she would place a nose in my hand.  However, Ella kept using the table like a gymnastics bar and kept launching herself off of it. 

I worked hard to keep my cool. I think I halfway succeeded.

Including the adhering of the ears, each pop required NINE different small items to be attached to it.  Nine times 36 pops...You do the math. 

The way the cake pops were supposed to look:

The way mine looked:
All I can say is that I think I needed to make the triangles flatter and that she must have also had flatter candies in her candy necklace.  My owls were bug eyed and looked like they had some unresolved optical issues.  Plus the mouse ears.  Who wants a mouse cake pop?  Probably a kid, actually.
 
Then onto the cake. 

 
Honestly, prepping to decorate a cake takes almost as time as the decorating itself.  I made a huge batch of butter cream frosting, tinted it 5 different shades, added in the chocolate butter cream I had left over from filling the cakes and I was ready to go.
 
Except that I had a mini anxiety, self-doubt attack at this point. What had I gotten myself into?  Why did I think I could "draw" with frosting on a cake?  I had already frosted the base of the cake green and used a toothpick to make it look like grass and the butter cream was drying out and it came out kind of messy.  What if the whole thing was a bomb and I had to be bailed out by the Hannaford bakery?  This was our gift to the babies, the hard work was part of the love.  How could we go essentially empty handed with a store-bought cake?  Oh the pressure.  I pictured myself showing up at the party with my proverbial tail between my legs, ashamed of my over inflated sense of cake mastery and nursing a bruised ego.
 
I gave myself a pep talk to shut down the crazy talk and got to work.  I practiced making trees on a cutting board.  Sandi came home and told me it looked great. When I told her how nervous I was she reminded me that that has happened before every cake I've made.  I hate love it when she's right.
 
Maya was super supportive and kind to me.  She kept coming in the kitchen (which was daring since I had essentially told the kids to stay out) and saying, "WOW Momma! That looks A-MAZING!  I can't believe what a good job you're doing!  They are going to love it!!"  And then she would hug me and leave only to return like a boomerang to check my progress.
I was also really anxious about the lettering and spacing and used toothpicks to mark where I needed each letter. I also checked the spelling of "birthday" in my head 15 times because for some reason I was preoccupied with spelling it wrong and having my cake appear on "cake wrecks."

My favorite quote from the party was when Marianne said, "I wasn't sure if that grass was colored coconut, shredded paper or cut up Easter grass so I tried it to find out."  I could just imagine myself snipping up Easter grass and then placing this non-edible thing all around the base of a cake to make grass. That and the image of Marianne potentially eating shredded paper.  
 
The cake pops were a huge hit with the kiddos and there were at least 25 extra for people to take home.
 
But really it was these two I had hoped to impress!

Baxter
Drew
 
How adorable are they?


I am so incredibly proud of this family.  What an honor to watch a family evolve, expand and find its new groove.  Hats off to you Merill-Maguires.    Thanks for letting us be a part of it.


Saturday, November 17, 2012

happy gay day

I have the best kind of friends. The kind that decide there needs to be a celebratory flash mob dance when there is a landmark victory at the polls.  Or at the very least a party. 

Last Saturday night at Paddy Muphy's, there was a party.  (We were going to dance but apparently it wouldn't have caused  a crisis of faith in the building construction for the diners below if there had been dancers on the second floor of this historic building.)


Ange and Emilie made this amazing out and proud cake.  We sang "happy gay day to you." It was awesome. 
(I love the expressions in this photo.)
 
 
And this baby isn't just beautiful.  It has sweet potato cooked into the cake.  And frosted with lemon buttercream.  Everyone deserves to have friends, and cake, like this.   
 

As people started to leave and the bar tenders weren't so occupied, the kids sidled up to the bar stools and got a little lesson in taps.   All that was missing was Billy Joel singing, "The Piano Man" and the scene would have been complete.


Monday, November 12, 2012

Girl's birthday party 2012 (a.k.a. doing it right)

Often in life if you don't get a lesson it repeats itself. 
 
I am not proud to say that there are many lessons I have had loop back around a ridiculous number of times. 
 
Shortcuts often make things longer in the end.  Don't hire too-good-to-be-true people to work on your house because they usually are, in fact, too good to be true.  If you get an inkling to put air in your tires,  heed this warning or you will end up with a flat.  Eating too much at a party doesn't make you feel festive and light, it makes you feel swollen and fat. 
 
The list goes on and on.
 
Our girls' birthdays are only 3 weeks apart.  In the past we have done joint parties for them, but last year, in the interest of allowing them to be separate people, we threw them each the party of their choice.  Maya's was at the gymnastics place ($150 plus favors) and Ella's was at the roller rink ($175 plus favors) which was so congested with people that I needed to be medicated and Ella didn't even really enjoy it. 
 
We left saying, never again.
 
So this year, we decided to throw one joint family party at our house for the girls in between their birthdays and let them do something special on their actual birthday.  As it turns out, our family is growing (both in number and our kids are getting physically bigger) and our house is not.  We simply can't fit the same number of eight-year-olds as we could three-year-olds.  Also, with Sandi in school for another year, we simply aren't in the position to spend that kind of money on birthday parties. 
 
We've come to learn that for our kids, less if definitely more. If they are surrounded by all their friends and family at once, it is too overwhelming for them and they don't have a good time.
 
Saturday, we celebrated the girls' birthdays with Skyler and Reed by going rollerskating (free) and coming back to our house to make ice cream sundaes and play (nearly free).  It was perfect two on two time for the kids.   I didn't really get a great picture but you get the idea. 
 

For the girls' party, we kept things very simple. Snacks, drinks, cake. No favors. Sandi set the bounce house up in our bedroom (the small 6 kid bounce house Patti and Dwight got for the kids a few years ago) with their choice of music. It was a very relaxed feel downstairs with the adults able to visit and the kids running in and out.
 
Ella's dreams had come when her grandparents bought her McKenna the American Girl doll for her birthday.  Kristi bought her the matching outfit and it is a match made in heaven. 
 
(McKenna herself is becoming somewhat of a problem for me, though.  She is interfering with everything from getting out of the house on time to finding a place to sit during family things.  She is very picky about how her hair is fixed and each day she must be changed from her pjs into an outfit and back to pjs at night.  It is as though she doesn't realize that we actually need Ella to participate in the rest of life despite McKenna's arrival into our family.  And the other night she INSISTED I put her hair in a waterfall braid so we could go out.  The nerve....)


Ella was thrilled to get a bunch of accessories for McKenna.


Noah's gifts came addressed to them in braille.  Maya was quite proud of that.


Hello Kitty Uno.  Need I say more?

This year for the girls' cake, I went with the fairy theme in a different way. I conjured this idea up in my head one day and somehow made it happen.  I'm still not entirely sure how.  The only bummer is it was supposed to have 3 more fairies but they got lost in Amazon transit and will probably show up tomorrow.
 
 The tower is actually a jug of protein shake powder wrapped in foil and then frosted.  And I will go on record saying that I am very proud of the construction of the toothpick fairy bridge. It was a rare example of something coming out as I had planned it in my head.


I am definitely proud of how far my cake making has grown in a year, but there are still so many little imperfections I keep wanting to master.  But the girls literally squealed in delight when they saw it and that makes it all worth it.

Trish and Brock snuggling with Hello Kitty.


cousins
 Sandi hauled at the tripod and the remote control photo taker (I'm sure it has a more glamorous name than that) and finally we got a picture of the girls together.

And then some of the four of us.
 This is a fair representation of our family right here:
 

Love my girls.  All three. Lucky us.

Monday, September 3, 2012

wedding cake practice


One of my strengths is my willingness to take on a challenge.

I'm pretty sure one of my weaknesses is my willingness to take on a challenge.

Last year my friend Melissa generously taught me how to make a real cake.  Ella wanted a fairy house for her birthday and Melissa walked me through making it for Ella. I learned about fondant, shaping cake, having the right cake recipe and all the secrets that go on underneath the pretty colors and decorations to make a polished finished product.


It was such fun I decided at Christmas to try one on my own.


I'm really not sure why I thought that making these two cakes (and only one by myself) made me feel qualified to offer to make Tricia's wedding cake for her at the end of this month.   Honestly, looking back at the bumpy, lumpy Christmas cake, I don't think I had any business making such a grand offer.

Trish and I have spent hours designing and discussing cake- layers, ribbon, shape, flavors, etc.  I have tried to be realistic about my skill level and knowledge. I have also practiced a lot.  I made my birthday cake in part because I wanted to play with the cake recipe, the stacking and freezing of the cake and the fine art of smoothing butter cream. 

New to my house: this bag of flour and 17 pounds of butter in my freezer.

My birthday cake: two pans of pound cake stacked and filled to be wrapped and frozen.

When the cake is frozen you then trim it and carve it into what you want.  This is actually very tricky for me because straight lines aren't my strength.  The key here is to have a very dense cake (read: lots of butter and eggs).  Forget Dunkin Hines and Betty Crocker. You need pound cake. 

For this cake I didn't use fondant but rather smooth butter cream.
 
I had an issue with one of the rectangular pans overcooking so instead of using it as a layer, I made petit fours instead:


I tried a few different cake recipes and had Trish and Brock decide which they liked best.  I have had an obscene amount of decadent leftover cake at my house.  This round was a reject that I had in my freezer and, in the spirit of practice makes perfect, I frosted it and put some flowers on it to give to some friends. Plus, I have two more stacked and wrapped rounds in my freezer awaiting their destiny.

But the most important practice I have gotten was this weekend when I made Tricia's bridal shower cake.  I made the cake weeks ago and took it out of the freezer to bring to Beals Island. Once there, I froze it again and took it out when I was ready to frost it.  I got set up in the (amazing) church kitchen the night before to get the base layer on the frozen cake.
 
Here is my nephew and cake tester, Brevan:


I did this step the night before because I wanted to do it on frozen cake but didn't want the cake to be frozen the morning of the shower.  I applied the first base crumb layer to each round and then left them in the fridge overnight.

In the morning I went for a beautiful 8 mile run on the island to get my nerves out, showered, drank some tea and headed over to the quiet church to work.  Because this skill is not entirely established in me, I really needed a quiet head and space to think and work. 

Smooth butter cream is essential to smooth fondant.  My friend Melissa lent me any and all cake decorating supplies I needed including this spinning cake stand and a tool for smoothing that made this much easier.  Plus lots of consulation and moral support and the offer to actually help me decorate the wedding cake. (Thank you Melissa.)
 
Another secret to smooth frosting?  A wet paper towel.
 
One thing I definitely realized is that you can hide some discrepancies in the cake with frosting (building it up to hide a gouge for instance) but the more level and even the cake, the better the end result.  I had a lot of unevenness to contend with and at some point had to stop shaving the cake because I was afraid I was doing more harm than good.


Slightly uneven, but ready for fondant.


Rolling the fondant is not so bad.  Picking it up to drape it squarely over the cake is nerve wracking.


I was really excited when I got tier 2 secured onto the bottom.  A cake this size doesn't probably need dowel stabilization but, because I will need to do it on the wedding cake, I wanted to practice.  I measured and cut the dowels to just barely poke out of the bottom layer and then attached them to the bottom of the plastic cake plate that separated the layers.  The top of the plate has spikes onto which you place the next layer (that is already covered in fondant).  Once I got tier 2 plunked onto those spikes, I breathed a big sigh.  I was super scared at messing that up.


Thankfully, Sandi and her eye for symmetry were around and could help pin the ribbon on.  (It's possible she did some muchly needed cheer leading as well.)


All finished!


Oh, yeah. And there was actually a shower associated with all that cake making. 
 
Tricia, the beautiful bride-to-be:


I think someone took a bucket of nieces and nephews and dumped it on her. (Ella is in the back peering through the balloons.)


sisters
Kristi made these beautiful hydrangea centerpieces.


Cake decorating things I need to work on:

1. Having a more consistent hand with piping and etching.
2. How to make the cake underneath even smoother so there are no bumps in the fondant.
3. Finding the right consistency of royal icing so as not to get carpal tunnel while piping.
4. How to make everything more level.
5. How to make finer etching for the wedding cake (I used a #3 tip here and it was still pretty thick) because the design of the wedding cake Trish picked calls for a very delicate, wispy etching.
6. How not to eat so much of the cake scraps. No joke.
 
A wedding cake.  No pressure, right? 
 
Site Meter